UIAlertController was introduced with iOS 8 with the replacement of UIAlertView and UIActionSheet, yes these two methods are deprecated in iOS 8
UIAlertController object is used to display alerts and actions sheets to the user, Switching between an alert or action sheet is done by setting the preferred style when creating the controller. If you are a serious documentation lover refer to the UIAlertController apple documentation here.
This UIAlertController Example has been written in swift so, you must need Xcode 6 or greater version to run this application.
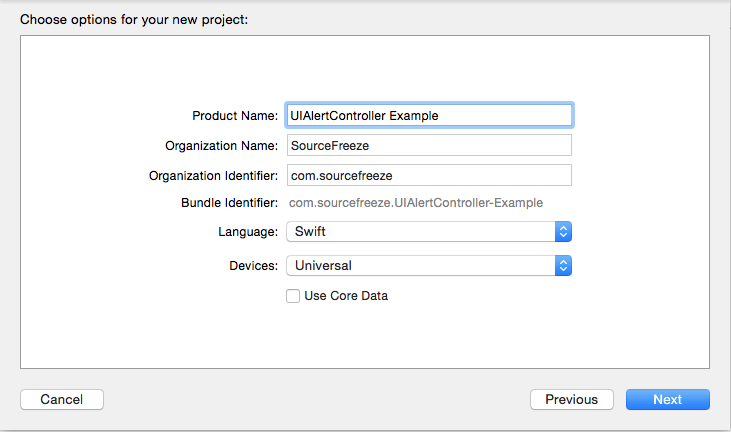
Open the Xcode, Create a new single-view application,

Then enter the product name as “UIAlertController Example” after that fill out the Organization Name, and Organization Identifier and select the “Swift” in the language field. Please leave the ‘Use Core Date’ field as unselected because we are not using that feature in this project, then Click next and save the project.
In this example i am going to create a project with five buttons, each button will describe the different style of UIAlertController, as listed below.
1. Simple UIAlertController
2. UIAlertController With TextField
3. UIAlertController With LoginForm
4. UIAlertController With Multiple Buttons
5. Standard UIActionSheet
Then, Open the Main.storyboard file, Drag and Drop the five iOS Buttons into the main view, and name the buttons as mentioned in below.

Next, Create the IBAction for the added buttons, click the “Show Assistant Editor”, and add the IBAction for Simple AlertController Button and name the action method “alertControllerAction” as shown below.

Next connecting, all buttons with same IBAction method, because in action we can identify which button was clicked by using tag value so it can eliminate lot of code and increase the performance.
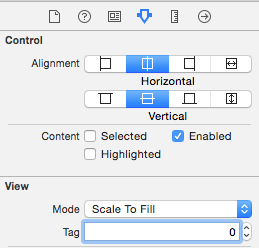
For adding the tag value, just select the button, and go to the “Show the Attributes Inspector” tab, under the View find the tag property.
Add tag as value as ‘0’ for “simple UIAlertViewController” button, and increase tag value correspondingly to other buttons.
next add the below code snippet into alertControllerAction method like below, here we have used if condition to identify the button click using tag value.
@IBAction func alertControllerAction(sender: AnyObject) {
        if (sender.tag == 0)
        {
           // insert Simple UIAlertController code here..
        }
        else if(sender.tag == 1)
        {
           // insert UIAlertController with TextField code here..
        }
        else if(sender.tag == 2)
        {
           // insert UIAlertController with LoginForm code here..
        }
        else if(sender.tag == 3)
        {
           // UIAlertController With Multiple Buttons code here..
        }
        else if(sender.tag == 4)
        {
           // Standard UIActionSheet code here..
        }
    }
Simple UIAlertController
Create UIAlertController with title, message and preferred style objects, for setting the preferred style value use UIAlertControllerStyle (.Alert and .ActionSheets) object, .Alert it will used to show the alert message and .ActionSheet used for to display action sheets.
UIAlertControllerStyle is actually an enumeration method it contains ActionSheet and Alert values, as listed in the below.
enum UIAlertControllerStyle : Int {
case ActionSheet
case Alert
}
then add the alertcontroller ok button and cancel button actions using addAction method and present the alertcontroller using presentViewController.
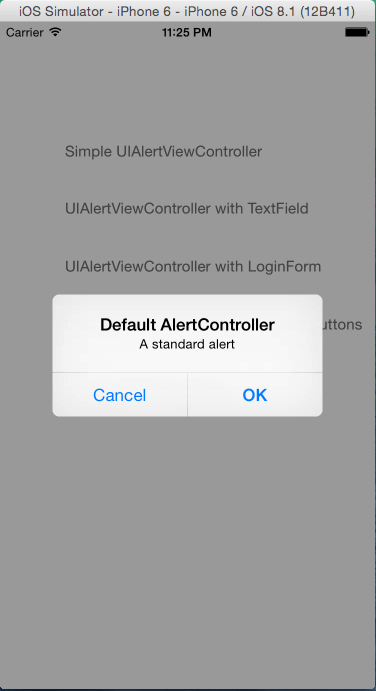
use the below code to create the simple uialertcontroller
let alertController = UIAlertController(title: "Default AlertController", message: "A standard alert", preferredStyle: .Alert)

            let cancelAction = UIAlertAction(title: "Cancel", style: .Cancel) { (action:UIAlertAction!) in
                println("you have pressed the Cancel button");
            }
            alertController.addAction(cancelAction)

            let OKAction = UIAlertAction(title: "OK", style: .Default) { (action:UIAlertAction!) in
                println("you have pressed OK button");
            }
            alertController.addAction(OKAction)

            self.presentViewController(alertController, animated: true, completion:nil)
place the code in the above corresponding button tag, then build and run the application the output looks like below.
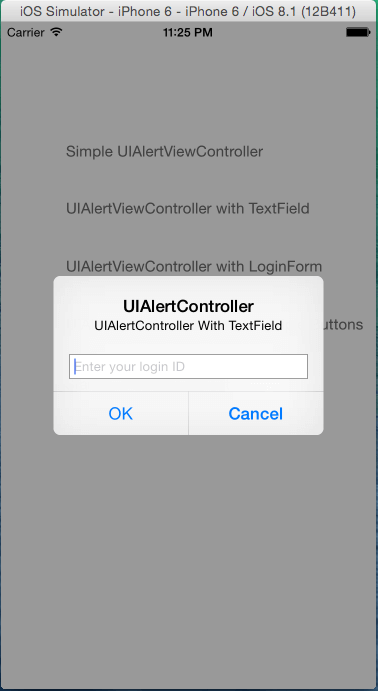
UIAlertController With TextField
Created the iOS AlertController object, as described in the above default UIAlertController, next create the UITextField object and addTextFieldWithConfigurationHandler method: used to add TextField into iOS 8 UIAlertController object, we can add any number of textfields using this object, But each TextFields should have to configure and customize. Access the UIAlertController TextField value using loginTextField object.
Use the below code to add the TextFields into UIAlertController.
var loginTextField: UITextField?
let alertController = UIAlertController(title: "UIAlertController", message: "UIAlertController With TextField", preferredStyle: .Alert)
let ok = UIAlertAction(title: "OK", style: .Default, handler: { (action) -> Void in
                println("Ok Button Pressed")
            })
let cancel = UIAlertAction(title: "Cancel", style: .Cancel) { (action) -> Void in
                println("Cancel Button Pressed")
            }
alertController.addAction(ok)
alertController.addAction(cancel)
alertController.addTextFieldWithConfigurationHandler { (textField) -> Void in
         // Enter the textfiled customization code here.
         loginTextField = textField
         loginTextField?.placeholder = "Enter your login ID"
            }
presentViewController(alertController, animated: true, completion: nil)
place the code with corresponding button tag, then build and run the application, output will looks like below.
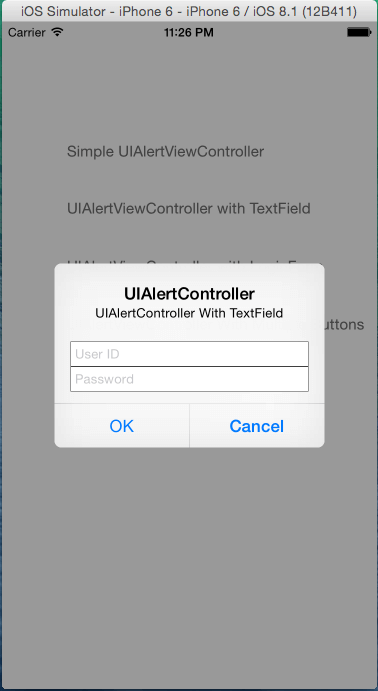
UIAlertController With LoginForm
Create the UIAlertController object and add the two textField objects using addTextFieldWithConfigurationHandler: method, first one for loginTextField and second one for password textField, so we are setting secureTextEntry value as ‘true’ for password textfield.
Use below code to add the loginform into UIAlertController.
            var loginTextField: UITextField?
            var passwordTextField: UITextField?
            let alertController = UIAlertController(title: "UIAlertController", message: "UIAlertController With TextField", preferredStyle: .Alert)
            let ok = UIAlertAction(title: "OK", style: .Default, handler: { (action) -> Void in
                println("Ok Button Pressed")
            })
            let cancel = UIAlertAction(title: "Cancel", style: .Cancel) { (action) -> Void in
                println("Cancel Button Pressed")
            }
            alertController.addAction(ok)
            alertController.addAction(cancel)
            alertController.addTextFieldWithConfigurationHandler { (textField) -> Void in
                // Enter the textfiled customization code here.
                loginTextField = textField
                loginTextField?.placeholder = "User ID"
            }
            alertController.addTextFieldWithConfigurationHandler { (textField) -> Void in
                // Enter the textfiled customization code here.
                passwordTextField = textField
                passwordTextField?.placeholder = "Password"
                passwordTextField?.secureTextEntry = true
            }

            presentViewController(alertController, animated: true, completion: nil)
place the code with corresponding button tag, then build and run the application, output will looks like below.
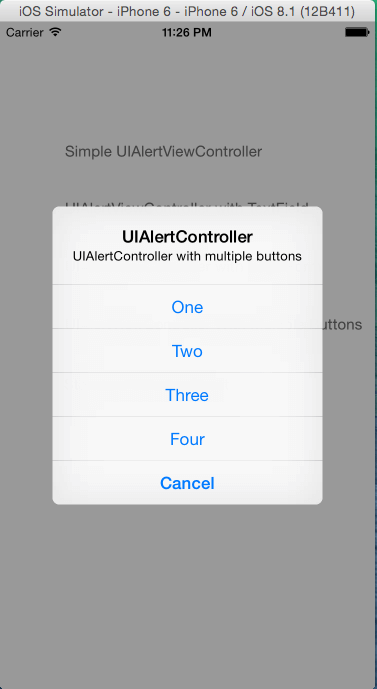
UIAlertController With Multiple Buttons
Create the UIAlertController object, using the addAction method we can add more buttons, the buttons in the alerts are stacked horizontally.
Use the below code to add the multiple buttons in the alerts.
let alertController = UIAlertController(title: "UIAlertController", message: "UIAlertController with multiple buttons", preferredStyle: .Alert)
              let buttonOne = UIAlertAction(title: "One", style: .Default, handler: { (action) -> Void in
                println("Button One Pressed")
              })
              let buttonTwo = UIAlertAction(title: "Two", style: .Default, handler: { (action) -> Void in
                println("Button Two Pressed")
              })
              let buttonThree = UIAlertAction(title: "Three", style: .Default, handler: { (action) -> Void in
                println("Button Three Pressed")
              })
              let buttonFour = UIAlertAction(title: "Four", style: .Default, handler: { (action) -> Void in
                println("Button Four Pressed")
             })
             let buttonCancel = UIAlertAction(title: "Cancel", style: .Cancel) { (action) -> Void in
                println("Cancel Button Pressed")
             }
            alertController.addAction(buttonOne)
            alertController.addAction(buttonTwo)
            alertController.addAction(buttonThree)
            alertController.addAction(buttonFour)
            alertController.addAction(buttonCancel)

            presentViewController(alertController, animated: true, completion: nil)
place the code with corresponding button tag, then build and run the application, output will looks like below.
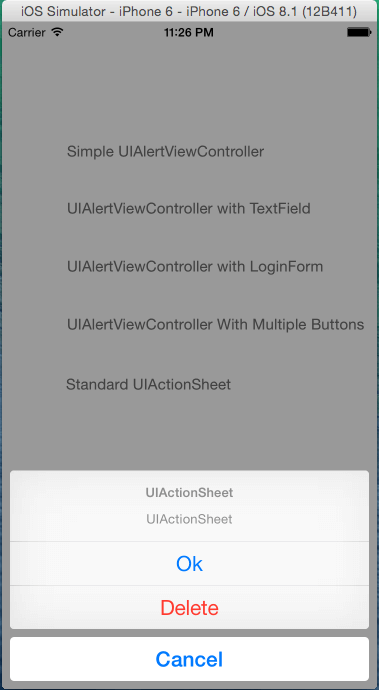
Standard UIActionSheet
An iOS action sheet displayed in the context of the view controller that presented it. We can create the UIActionSheet, for setting the UIAlertController preferredStyle values as .ActionSheet, the remaining configuration is same as UIAlertController object, next we can add ok and cancel button using addAction method.
And add the Destructive button, by setting the button style as .Destructive, as mentioned in the below.
Use the below code to create UIActionSheet
let alertController = UIAlertController(title: "UIActionSheet", message: "UIActionSheet", preferredStyle: .ActionSheet)
            let ok = UIAlertAction(title: "Ok", style: .Default, handler: { (action) -> Void in
                println("Ok Button Pressed")
            })
            let cancel = UIAlertAction(title: "Cancel", style: .Cancel, handler: { (action) -> Void in
                println("Cancel Button Pressed")
            })
            let  delete = UIAlertAction(title: "Delete", style: .Destructive) { (action) -> Void in
                println("Delete Button Pressed")
            }

            alertController.addAction(ok)
            alertController.addAction(cancel)
            alertController.addAction(delete)

            presentViewController(alertController, animated: true, completion: nil)
place the code with corresponding button tag, then build and run the application, output will looks like below.
I hope now you can understand how uialertcontroller works. for your reference you can download the complete UIAlertController Example Project from here.
Leave a Reply