Source Freeze

  • Home
  • iOS
  • Swift
  • Cross-Platform
  • About
  • Contact
Home » iOS UIPickerView Example using Swift

iOS UIPickerView Example using Swift

August 19, 2022 by Source Freeze 18 Comments

UIPickerView Example Introduction

In the Previous example we have learned about how to implement iOS DatePicker Example using swift. UIDatePicker is the Custom subclass of UIPickerView .In this tutorial we will see about how to implement UIPickerView Example using swift.

UIPickerView object is used to show the one or more set of values using spinning-wheel or slot-machine metaphor. Users can select values by rotating the wheels so that the desired row of values aligns with a selection indicator.The main use of UIPickerView object is to select multiple values as  drop-down box in the web.

This  Example has written in swift so, you must need Xcode 6 or greater version to run this application.

Open the Xcode to Create a new single view application,

xcode6 single view application

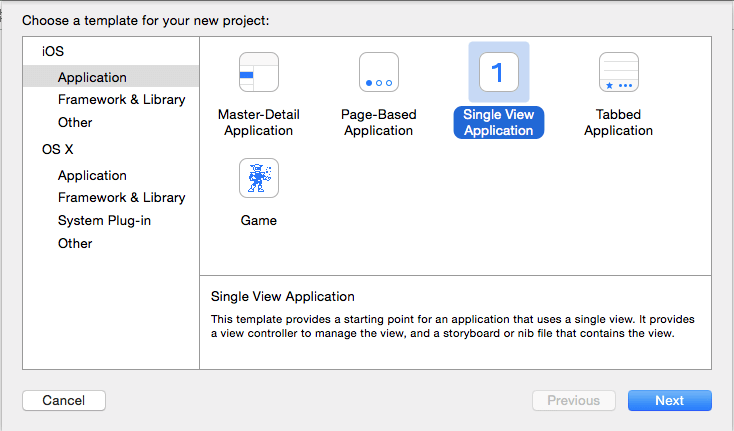
Then enter the product name as “UIPickerView Example” after that fill out the Organization Name, Organization Identifier and select the “Swift” in the language field.Please leave the ‘Use Core Date’ field  as unselected because we are not using that feature in this project.Click next and save the project.

xcode6 single view application

Adding UIPickerView into storyboard

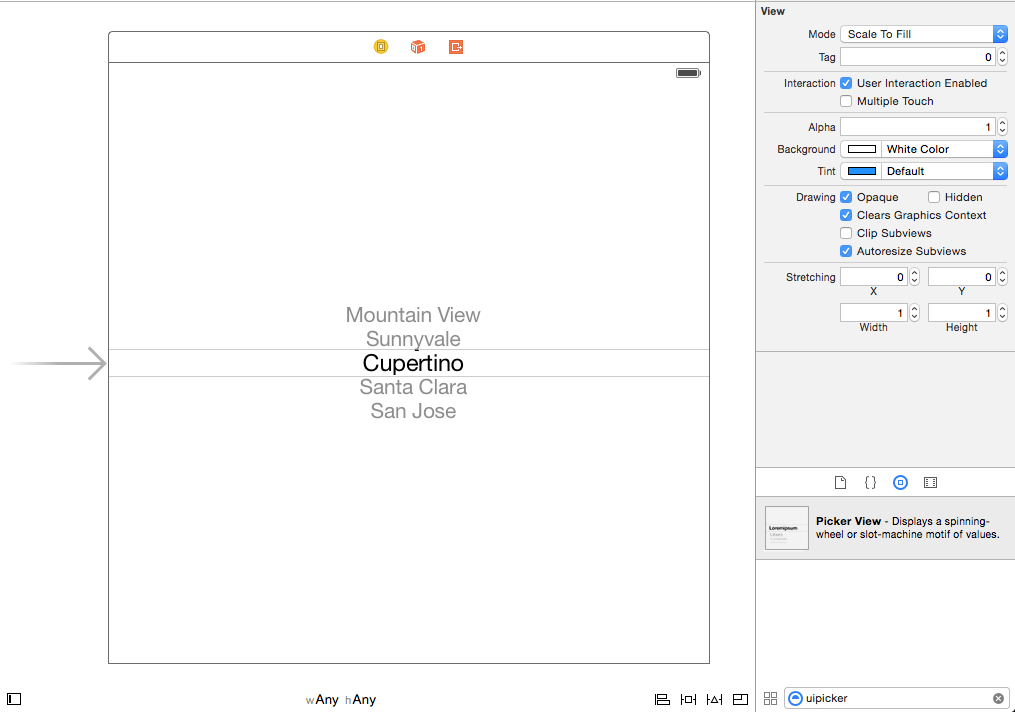
Next click Main.storyboard file, the interface builder will load the UI, then select the UIPickerView object from object library,  drag into the superview of  viewcontroller, it will looks like below.

 Add UIPickerView Control into interface builder

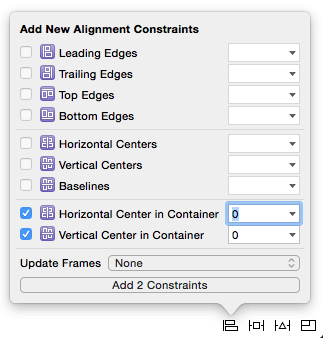
Now, center align the UIPickerView object by selecting the align label listed in the bottom of the storyboard view. Click the check box of Horizontal center in container and Vertical center in container then select the “Add 2 Constraints”  button as shown in the below.Now iOS UIPickerView added into center of the view, it will works fine with all the iPhone and iPad.

ios uipickerview constraints add cente

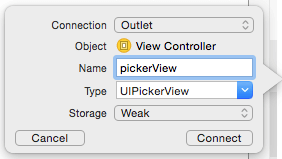
Next, Select the Assistant Editor and create IBOutlet for UIPickerView object by holding the control button and click the UIPickerView object then drag into the ViewController.swift file.It will open a popup view like below then enter the Name as “pickerView”  and click Connect.

Adding IBOutlet for UIPickerView Example

Connecting UIPickerView Datasource and Delegates

Then, go to the Main.storyboard file, select the show connections inspector tab,  then click the UIPickerView and add the delegate and datasource for UIPickerView as shown in the below.

Adding UIPickerView Delegates and DataSource

Next, select the ViewController.swift file. UIPickerView needs delegates and datasource  which we can add  like below.

class ViewController: UIViewController, UIPickerViewDataSource, UIPickerViewDelegate

We have to set the value as self for UIPickerView delegate and datasource, and create a datasource for to set the pickerview, here we have used pickerDataSource array as datasource.


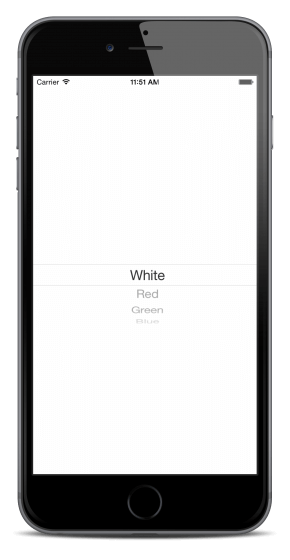
var pickerDataSource = ["White", "Red", "Green", "Blue"]
override func viewDidLoad() {                
super.viewDidLoad()        
self.pickerView.dataSource = self
self.pickerView.delegate = self
}


Actually the above code used to set ViewController instance as the datasource and delegate of the Picker View.

Now, we have to implement the appropriate UIPickerView delegate methods.

func numberOfComponentsInPickerView(pickerView: UIPickerView) -> Int { return 1 }
func pickerView(pickerView: UIPickerView, numberOfRowsInComponent component: Int) -> Int {
return pickerDataSoruce.count
}
func pickerView(pickerView: UIPickerView, titleForRow row: Int, forComponent component: Int)
-> String!
{ return pickerDataSource[row] }

The numberOfComponentsInPickerView method used for the number of columns in the picker element.

The numberOfRowsInComponent method used for the number of rows of data in the UIPickerView element so we return the array count.

The pickerView:titleForRow:forComponent: method used for the data for a specific row and specific component.

Next, Build and Run the application where you will get the output like below.

iOS UIPickerView Example outpt

Detecting UIPickerView selected Row

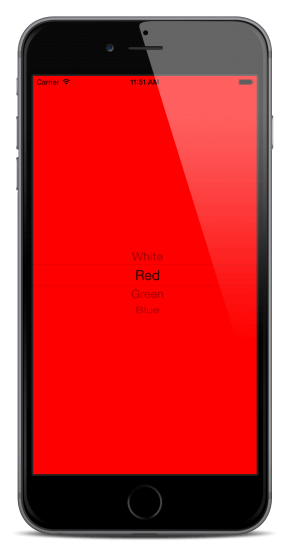
When selected UIPickerView row the below delegate method will be called, here we have changed the background color of uiview corresponding to the UIPickerView selected row values.


func pickerView(pickerView: UIPickerView, didSelectRow row: Int, inComponent component: Int) {
if row == 0 {
self.view.backgroundColor = UIColor.whiteColor()
} else if row == 1 {
self.view.backgroundColor = UIColor.redColor()
} else if row == 2 {
self.view.backgroundColor = UIColor.greenColor()
} else {
self.view.backgroundColor = UIColor.blueColor()
}
}

Now, select the pickerview row value as “Red”, you will get the output like below.

iOS UIPickerView Selected Row Output

Adding More Components into UIPickerView

Now, Let’s add more components into UIPickerView.

First step is we have to change the datasource as multi-dimensional instead array of simple-dimensional array as like below.

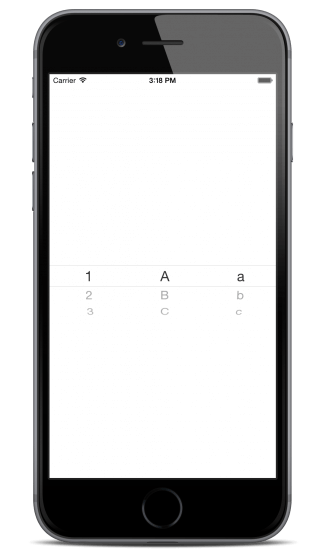
var pickerDataSource = [["1", "2", "3", "4"], ["A", "B", "C", "D"], ["a", "b", "c", "d"]]
override func viewDidLoad() {        
super.viewDidLoad()        
self.pickerView.dataSource = self
self.pickerView.delegate = self
}

and also have to change the numberOfComponentsInPickerView method like below.

func numberOfComponentsInPickerView(pickerView: UIPickerView) -> Int 
{  
return 3 
}

here we have returned 3, because pickerDataSource multi-dimensional array count is 3.

Next, change the pickerView:titleForRow:forComponent: method

 func pickerView(pickerView: UIPickerView, titleForRow row: Int, forComponent component: Int)
-> String!
{         
return pickerDataSource[component][row]     
}

Then, Build and Run the application you will get the output like below.

uipickerview multi selected row output

Download the Source Code for this iOS UIPickerView Example here.

Filed Under: ios-tutorial, swift, uipickerview

Comments

  1. hugo says

    May 26, 2015 at 3:10 am

    It’s great! Thanks a lot.

    Reply
  2. pan says

    June 16, 2015 at 7:26 pm

    thanks for good tutorial.

    Reply
  3. Tommy Mayhew says

    October 28, 2015 at 2:22 am

    I’m getting errors!!

    Reply
  4. Daniel Owen says

    December 15, 2015 at 10:53 pm

    pickerDataSoruce.count is a type, but got me started, thanks

    Reply
  5. Blake Jett says

    March 18, 2016 at 8:08 pm

    how do you have the UIPickerView pop up upon a button click

    Reply
  6. Thompson Fletcher says

    March 23, 2016 at 4:01 pm

    Why on earth wouldn’t you do a switch for row instead of “if else”?

    Reply
    • killerclick says

      April 12, 2016 at 10:05 pm

      If-else is easily understandable even to beginners. For switch you have to know what switch is and how it works or look it up. When I was a nub I hated it when tutorials were making assumptions about what I knew.

      Reply
  7. Atibhav Mittal says

    June 18, 2016 at 9:54 pm

    Thanks for the great tutorial. Is there any way the font size of each of the items in the UIPickerView can be changed?

    Reply
  8. marc says

    July 27, 2016 at 2:31 am

    Hello, is it possible to associate the pickerview to a button that allow me to go on a viewcontroller depending on the selection in the pickerview? thank you very much if you have information

    Reply
  9. Adam Stoller says

    August 16, 2016 at 8:09 pm

    Semi-related (sorry, not sure if this is appropriate): I have a UIPickerView which gets its data from a database (core data in this case) – the picker is associated with a text field. The objective is to be able to select an existing entry from the picker or be able to create a new entry that gets added to the picker for the next time the app is run. In general, this is all working fine – except for one part: When the app first loads, the text field is blank (desired) but the picker view shows the first existing value selected (not desired) – How can I add a blank entry at the beginning of the picker without having such an entry in the database?

    I tried adding the following to my viewDidLoad(), but it didn’t seem to make any difference:
    picker.selectRow(-1, inComponent: 0, animated: false)

    Reply
    • Adam Stoller says

      August 16, 2016 at 10:41 pm

      I received an answer in another forum – basically:
      – in ‘numberOfRowsInComponent’ return ‘rows + 1’ to add a blank row
      – in ‘titleForRow’ and ‘didSelectRow’ – if row == 0 use a blank value (“”), otherwise use the value associated with ‘row – 1’ from the data.

      Reply
  10. BillSnebold says

    September 20, 2016 at 12:02 am

    For some reason the selector lines on the one I’m doing don’t show up. I’ve set their display to true in code as well as in storyboard but no dice. Any ideas?

    Reply
  11. Thomas Shaw says

    September 30, 2016 at 11:42 pm

    I keep getting Type “ViewController” does not conform to protocol ‘UIPickerViewDataSource’.
    I can’t figure it out, searched everything I can, still can’t find a clear answer, any thoughts?
    And it won’t let me create the connections to the dataSource and delegate in Outlets in the Connections Inspector tab.

    Reply
    • Maradona Mossiba says

      October 5, 2016 at 6:59 am

      That’s because you didn’t add the UIPickerViewDataSource delegate. On top of your ViewController file, it should look like this:
      class ViewController: UIViewController, UIPickerViewDataSource, UIPickerViewDelegate

      Than try again, good luck.

      Reply
      • Wade says

        November 15, 2016 at 7:17 am

        I tried the same thing and the same problem is happening to me, checked my ViewController and the it looks the same as yours.

        Reply
  12. Alaa says

    October 8, 2016 at 10:17 am

    Greate Tutorial….Thak you

    Reply
  13. dogooder says

    December 5, 2016 at 6:09 pm

    Hey, is there any way to start the UIPicker with a default row? e.g. pickerDataSource[3]

    Reply
    • zulfi says

      January 16, 2017 at 11:24 pm

      Add this variable :

      var selected: String {

      return UserDefaults.standard.string(forKey: “selectedRow”) ?? “”

      }

      =====================

      Add this to viewDidLoad :

      if let row = yourArray.index(of: selected) {

      yourPickerView.selectRow(row, inComponent: 0, animated: false)

      }

      =====================

      Add this code :

      func pickerView(_ pickerView: UIPickerView, didSelectRow row: Int, inComponent component: Int) {

      UserDefaults.standard.set(yourArray[row], forKey: “selectedRow”)

      }

      Reply

Leave a Reply Cancel reply

Your email address will not be published. Required fields are marked *

Recent Posts

  • Parse Float with 2 decimals in javascript
  • Best Next JS courses to learn Next JS in 2023
  • How to redirect to another page in next js
  • How to get the query parameters from URL in Next JS?
  • iOS DatePicker tutorial (UIDatePicker) using Swift
  • UIAlertController iOS 8 using Swift

Recent Comments

  • zulfi on iOS UIPickerView Example using Swift
  • Muhsin on Cordova InAppBrowser Plugin Example using ionic framework
  • SourceFreeze on Cordova InAppBrowser Plugin Example using ionic framework
  • Muhsin on Cordova InAppBrowser Plugin Example using ionic framework
  • SourceFreeze on Cordova InAppBrowser Plugin Example using ionic framework
  • Muhsin on Cordova InAppBrowser Plugin Example using ionic framework

Tags

cross-platform ionic iOS javascript mobile application development nextjs objective-c swift uiwebview Visual Studio plugin

Copyright © 2023 Source Freeze