In the previous tutorial we have learned about the getting started with ionic framework. now we are going to learn about how to access the device camera and photo library using cordova camera plugin and ionic framework. This sample will work android and iOS Devices.
Next create ionic framework sample using the below command, here we are creating ionic blank template project and name it as”CameraPluginDemo”.
ionic start CameraPluginDemo blank

cd CameraPluginDemo
Then add the android and iOS platforms using the below ionic commands.
ionic platform add android

ionic platform add ios
Note:
Remember you must have mac to build ios applications.
Next in this application we are integrating ngCordova library, if you are new to ngCordova framework here is simple description.
What is ng-Cordova?
“ngCordova is a collection of AngularJS services and extensions created by Ionic and driven by the community. These services make it easier to integrate Cordova plugins into Ionic applications”
Then, start downloading the latest ngcordvao library and place the ng-cordova.min.js file in your project’s www/js directory.
Add the ng-cordova.min.js reference above to the cordova.js file in the index.html as mentioned in the below.
<html>
<head>
<meta charset="utf-8">
<meta name="viewport" content="initial-scale=1, maximum-scale=1, user-scalable=no, width=device-width">
<title></title>
<link href="lib/ionic/css/ionic.css" rel="stylesheet">
<link href="css/style.css" rel="stylesheet">
<script src="lib/ionic/js/ionic.bundle.js"></script>
<script src="js/ng-cordova.min.js"></script>
<script src="cordova.js"></script>
<script src="js/app.js"></script>
</head>
<body ng-app="starter">
ng-cordova integration is still not over, now we need to include it for use in AngularJS. Open your app.js file and alter the angular.module line to look like the following.
angular.module('starter', ['ionic', 'ngCordova'])
Adding Cordova Camera Plugin
The next thing we want to do is add the Apache Cordova camera plugin. This can be done by running the following command.
cordova plugin add org.apache.cordova.camera
Now we are configured the application with cordova camera plugin.
Next have to add the buttons for take and choose picture in the ion-content tag. Once added button tag add the button click event using ng-click attribute and add ng-controller attribute in ion-content as mentioned in the below.
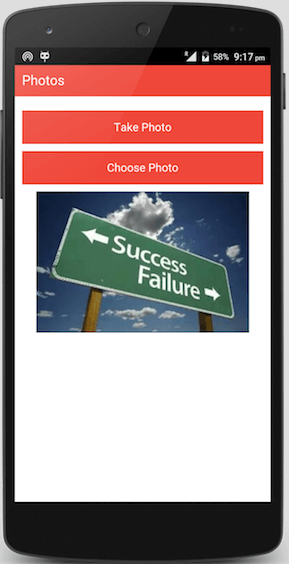
<ion-header-bar class="bar-assertive">
<h1 class="title">Photos</h1>
</ion-header-bar>
<ion-content ng-controller="ExampleController" padding="true">
<button class="button button-full button-assertive" ng-click="takePhoto()">
Take Photo
</button>
<button class="button button-full button-assertive" ng-click="choosePhoto()">
Choose Photo
</button>
</ion-content>
Then add the img tag here we have initially hided image by checking src attribute using ng-show and set the value ng-src as imgURI. This imgURI value will be set while choosing or taking picture function.
<img ng-show="imgURI !== undefined" ng-src="{{imgURI}}" style="text-align: center">
</ion-content>
then creating a controller in js file and add the function for take and choose picture, getPicture function used to take and choose photo by sending the options. we can set quality, destinationType, sourceType, etc. using option values. here is full source code for app.js functions.
angular.module('starter', ['ionic', 'ngCordova'])

.controller("ExampleController", function ($scope, $cordovaCamera) {

                $scope.takePhoto = function () {
                  var options = {
                    quality: 75,
                    destinationType: Camera.DestinationType.DATA_URL,
                    sourceType: Camera.PictureSourceType.CAMERA,
                    allowEdit: true,
                    encodingType: Camera.EncodingType.JPEG,
                    targetWidth: 300,
                    targetHeight: 300,
                    popoverOptions: CameraPopoverOptions,
                    saveToPhotoAlbum: false
                };

                    $cordovaCamera.getPicture(options).then(function (imageData) {
                        $scope.imgURI = "data:image/jpeg;base64," + imageData;
                    }, function (err) {
                        // An error occured. Show a message to the user
                    });
                }

                $scope.choosePhoto = function () {
                  var options = {
                    quality: 75,
                    destinationType: Camera.DestinationType.DATA_URL,
                    sourceType: Camera.PictureSourceType.PHOTOLIBRARY,
                    allowEdit: true,
                    encodingType: Camera.EncodingType.JPEG,
                    targetWidth: 300,
                    targetHeight: 300,
                    popoverOptions: CameraPopoverOptions,
                    saveToPhotoAlbum: false
                };

                    $cordovaCamera.getPicture(options).then(function (imageData) {
                        $scope.imgURI = "data:image/jpeg;base64," + imageData;
                    }, function (err) {
                        // An error occured. Show a message to the user
                    });
                }
            });
next we have to run the application using the below command lines. if you are running in emulator you can use emulate instead run.
ionic run ios

ionic run android
once run the application choose or take picture using specific feature, the output will looks like below and find the full source code of this example using our Github location.
Leave a Reply