In this example we will how to use UIActivityIndicatorView Example in swift, mostly we have used an activity indicator to show some operation status like webview start and stop.
Related: Webview Example in swift & MBProgressHUD Example
UIActivityindicatorview is appears as spinning wheel either it’s spinning or stopped state mostly an activity indicator in ios is used to show the task progress status.
This ios programming “UIActivityIndicator Example” uses swift so you must need Xcode 6 or greater version to run this application.
Open the Xcode and create a new single view application,
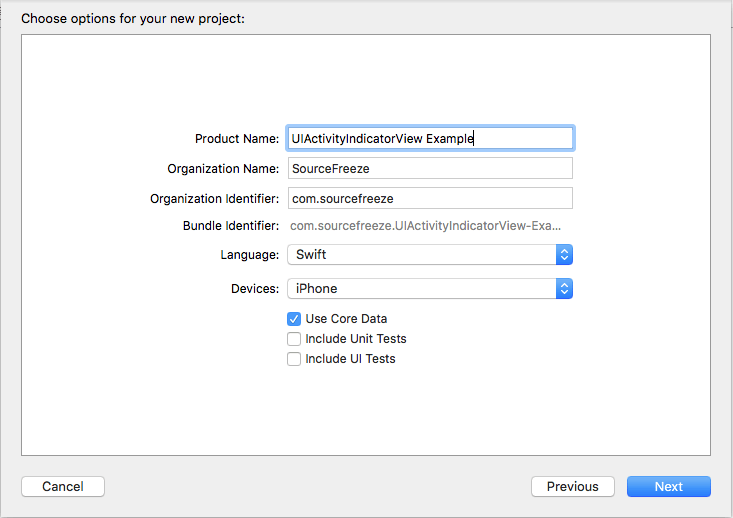
Then, enter the product name as “UIActivityIndicator Example” next fill out the Organization Name and Organization identifier then select “Swift” language and device family as iPhone and remains core data field unchecked because we are not using that feature. To create an activity indicator in ios we can either use a storyboard or programmatically create an instance let’s start our tutorial by using storyboard in the last part we will see how to create an activity indicator programmatically.
Adding UIActivityIndicator into storyboard
Then select the ViewController in the Main.storyboard file, drag and drop the UIActivityIndicator in the viewcontroller and also add start and stop button as mentioned in the below image.
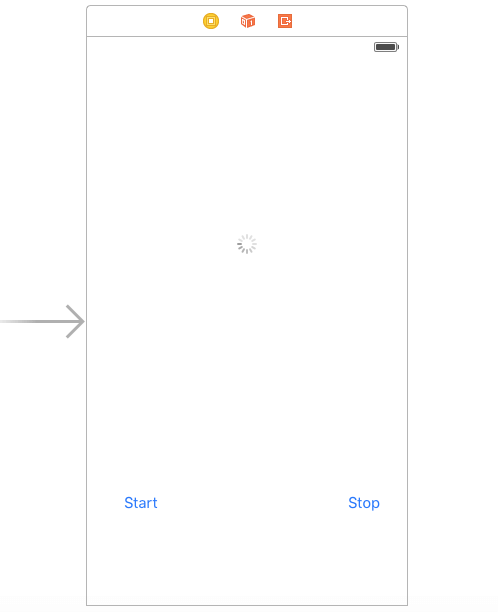
Next, we need to create IBOutlet for the UIActivityIndicatorView and IBAction for start and stop UIButton. Create IBOutlet for UIActivityIndicatorView and name it as “activityIndicator” and create IBAction for start button as “startActivityIndicator” and stop button as “stopActivityIndicator”
Then go to the ViewController.swift by selecting the Assistance editor and create IBOutlet for UIActivityIndicatorView
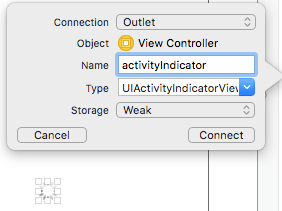
Select start activity indicator button and create action like below
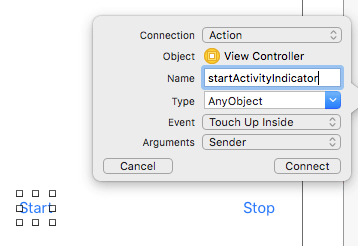
Select stop activity indicator button and create action like below.
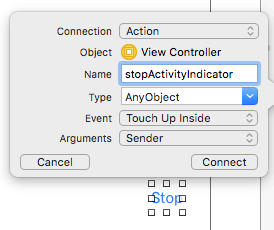
startAnimating() – used to start activity indicator
stopAnimating() – used stop activity indicator
Add this below codes snippet into “startActivityIndicator” method in the ViewController file.
@IBAction func startActivityIndicator(sender: AnyObject) {
activityIndicator.startAnimating()
}
Add the below code into “stopActivityindicator” method in the ViewController.swift file.
@IBAction func stopActivityIndicator(sender: AnyObject) {
activityIndicator.stopAnimating()
}
Also you can automatically hide an activity indicator when the animation stops by set the hidesWhenStopped property to YES in the viewDidLoad()
Also able to configure the activity indicator appearance by changing the activityIndicatorViewStyle method and using center method can set activity indicator into the center of the view.
Add the below code in the viewDidLoad method.
override func viewDidLoad() {
activityIndicator.hidesWhenStopped = true
activityIndicator.activityIndicatorViewStyle = UIActivityIndicatorViewStyle.Gray
activityIndicator.center = view.center
super.viewDidLoad() // Do any additional setup after loading the view, typically from a nib.
}
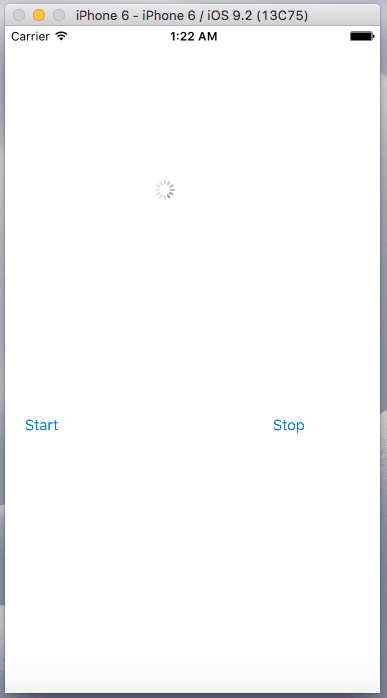
Then Build and Run the UIActivityIndicatorView Example you will get the output like below.
Create UIActivityIndicatorView programmatically
You can also Create UIActivityIndicatorView programmatically instead of using storyboard, while creating object use below code and follow same stop for start and stop activity indicator, then build and run the application you can will get the same output.
var activityIndicator = UIActivityIndicatorView(
activityIndicatorStyle: UIActivityIndicatorViewStyle.Gray)
override func viewDidLoad() {
activityIndicator.hidesWhenStopped = true
activityIndicator.activityIndicatorViewStyle = UIActivityIndicatorViewStyle.Gray
activityIndicator.center = view.center
super.viewDidLoad() // Do any additional setup after loading the view, typically from a nib.
}
Leave a Reply