Source Freeze

  • Home
  • iOS
  • Swift
  • Cross-Platform
  • About
  • Contact
Home » beginner » Page 3

Convert Milliseconds to a Date using JavaScript

December 11, 2023 by Source Freeze Leave a Comment

JavaScript offers versatile tools to handle dates and times. Converting milliseconds to a date is essential in various applications, from data processing to user interface interactions. We’ll explore two primary approaches to convert Milliseconds to a Date using JavaScript:

Convert Milliseconds to a Date using JavaScript

Let’s start by using the new Date() method to convert milliseconds to a date representation.

Exploring new Date() Method:

const milliseconds = 729459245971; // Example millisecond value
const date = new Date(milliseconds);
console.log(date);

Output:

1993-02-11T19:34:05.971Z

In this example, we assign the number of milliseconds to the milliseconds variable and then use new Date() to create a Date object.

We can convert the date in a human-readable string format using toString():

const milliseconds = 729459245971; // Example millisecond value
const date = new Date(milliseconds);
console.log(date.toString());

Output

Thu Feb 11 1993 19:34:05 GMT+0000 (Coordinated Universal Time)

Extracting specific components:

The new Date() method offers simplicity and efficiency in converting milliseconds to a date. Additionally, by employing methods like getMonth(), getDate(), and getFullYear(), we can extract specific date components from the resultant Date object.

const milliseconds = 729459245971; // Example millisecond value

// Accessing specific date components
const date = new Date(milliseconds);
const year = date.getFullYear();
const month = date.getMonth() + 1; // Adding 1 because months are zero-indexed
const day = date.getDate();

console.log(`${day}-${month}-${year}`);

Output:

11-2-1993

By using getFullYear(), getMonth(), and getDate(), we retrieve the year, month, and day from the Date object, respectively. Adjustments are made to the month value (+1) to match the conventional numbering of months.

Manipulating Date Elements:

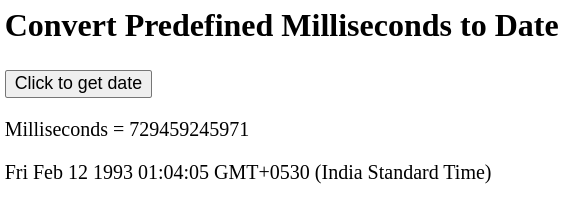
Let’s explore an example utilizing HTML and JavaScript to convert a predefined millisecond value into a readable date format upon a button click:

<!DOCTYPE html>
<html>
<head>
  <title>Convert Milliseconds to Date</title>
</head>
<body>
  <h2>Convert Predefined Milliseconds to Date</h2>

  <button onclick="displayDate()">Click to get date</button>

  <p id="milliseconds" style="font-size: 15px;"></p>
  <p id="convertedDate" style="font-size: 15px;"></p>

  <script>
    var milliseconds = 729459245971; // Predefined milliseconds value

    function displayDate() {
      var date = new Date(milliseconds);
      document.getElementById('convertedDate').innerHTML = date.toString();
    }

    // Display milliseconds value
    document.getElementById('milliseconds').innerHTML = "Milliseconds = " + milliseconds;
  </script>
</body>
</html>

This HTML document includes a button triggering the displayDate() function when clicked. The function uses the predefined millisecond value to generate the corresponding date and displays it on the webpage.

Output:

Here’s how the HTML page would look like:

Output to convert milliseconds into date

Conclusion:

In conclusion, we’ve explored two straightforward methods in JavaScript to effortlessly convert milliseconds into easily readable date formats. By using the new Date() method and crafting custom functions with HTML, we’ve learned practical ways to handle date conversions, empowering developers to manage time-related data seamlessly. These approaches offer flexibility and simplicity, catering to various needs while enhancing proficiency in JavaScript’s date manipulation capabilities.

Also checkout:

  • Capitalize First letter in JavaScript
  • Remove all Classes from an Element in JavaScript
  • Append Text to a Textarea in JavaScript

Filed Under: javascript Tagged With: beginner, javascript, web developer

How to create a style tag using JavaScript

December 11, 2023 by Source Freeze Leave a Comment

In web development, manipulating styles dynamically using JavaScript can be really handy. Let’s explore how to create a style tag using JavaScript in a web page to add styles using 2 different methods:

  • Using document.createElement()
  • Using insertAdjacentHTML()
Create a style tag using JavaScript

Creating a Style Tag in JavaScript using document.createElement():

Creating a style tag dynamically using JavaScript grants us the power to alter CSS properties programmatically.

// Step 1: Create a new style element
const styleTag = document.createElement('style');

// Step 2: Add CSS rules to the style element
styleTag.innerHTML = `
  .classname {
    color: blue;
    font-size: 18px;
    /* Add more CSS rules here */
  }
`;

// Step 3: Append the style tag to the document's head
document.head.appendChild(styleTag);

This code snippet showcases a simple way to generate a style tag dynamically. Let’s break down each step:

  • Creating the Style Element: We use document.createElement() to generate a new style element.
  • Adding CSS Rules: The innerHTML property is utilized to define CSS rules within the <style> tags. In this example, we’re setting text color to blue and font size to 18 pixels. You can include any CSS rules needed.
  • Appending to the Document’s Head: To apply these styles, the newly created style tag is appended to the <head> of the HTML document using appendChild().

By following the steps outlined above, we can manipulate styles programmatically, let’s dive deeper into the insertion of HTML adjacent to an element using the insertAdjacentHTML() method in JavaScript.

Adding a Style Tag with Styles using insertAdjacentHTML()

The insertAdjacentHTML() method comes in handy when we need to dynamically inject HTML content adjacent to an existing element. This method offers four different positions for insertion:

  • 'beforebegin': Inserts content before the targeted element.
  • 'afterbegin': Inserts content at the beginning of the targeted element, within it.
  • 'beforeend': Inserts content at the end of the targeted element, within it.
  • 'afterend': Inserts content after the targeted element.

Let’s explore how we can use this method in conjunction with JavaScript:

Step 1: Selecting the Target Element

Firstly, we need to identify the element after which we want to insert the style tag. This can be done by selecting an element using its ID, class, or any other selector.

const targetElement = document.getElementById('target');

Replace 'target' with the ID of the element where you want to insert the style tag.

Step 2: Defining CSS Rules

Next, we create the CSS rules that we want to apply dynamically. These rules will define the appearance or behavior of elements on the webpage.

const cssRules = `
  .classname {
    color: red;
    font-size: 20px;
    /* Add more CSS rules here */
  }
`;

You can modify these rules by changing properties like color, font size, or any other CSS properties you want to apply.

Step 3: Creating the Style Tag

Now, let’s create the <style> tag dynamically by combining the CSS rules within it.

const styleHTML = `<style>${cssRules}</style>`;

This code combines the CSS rules inside <style> tags, creating a complete style tag with the defined styles.

Step 4: Inserting the Style Tag

Finally, we’ll use the insertAdjacentHTML() method to insert the newly created style tag with styles after the selected target element.

targetElement.insertAdjacentHTML('afterend', styleHTML);

This line of code tells the browser to place the generated <style> tag containing our CSS rules just after the target element.

This approach allows us to dynamically inject CSS rules into our webpage, letting us change the appearance or behavior of elements on the fly without modifying the HTML or CSS files directly.

Conclusion:

In this exploration, we’ve delved into two powerful methods in JavaScript for dynamically manipulating elements within a webpage: creating a style tag using document.createElement() and the insertAdjacentHTML() method.

Also check out:

  • Capitalize First letter in JavaScript
  • Remove all Classes from an Element in JavaScript
  • Append Text to a Textarea in JavaScript

Filed Under: javascript Tagged With: beginner, javascript, web developer

Get Element by aria-label using JavaScript

December 10, 2023 by Source Freeze Leave a Comment

When we talk about get elements by aria-label using JavaScript, there are several methods at our disposal. Let’s see into three primary methods and explore the first one in detail but first What is an aria-label?

Get Element by aria-label using JavaScript

What is aria-label?

In the world of websites and apps, elements like buttons, images, or links often need labels to tell us what they do. But sometimes, these elements don’t have visible text labels. That’s where “aria-label” comes in.

Think of “aria-label” as a special tag we can give to things on a webpage to describe what they are or what they do. It’s like a hidden label that helps computers and assistive technologies, like screen readers, understand what an element is all about.

For instance, imagine a button with an icon instead of words. The “aria-label” acts like a secret message attached to that button, telling anyone who can’t see the icon what it’s there for.

Now let’s explore how to get Element by aria-label using JavaScript using the following methods:

  • Using querySelector for an Exact Match
  • Partial Match of aria-label Value
  • Narrowing Down with Specific Element Types

Using querySelector for an Exact Match

To begin with, one effective way to target an element with a precise aria-label is by using the querySelector method. This method fetches the first element in the document that matches the provided selector.

Let’s consider an example scenario:

<body>
  <button aria-label="Dismiss">X</button>
  <button aria-label="Submit">Submit</button>
</body>

If we wish to retrieve the button element with the aria-label attribute set to “Dismiss,” here’s how we accomplish it:

const dismissButton = document.querySelector('[aria-label="Dismiss"]');
console.log(dismissButton); // 👉️ button element with aria-label="Dismiss"

This code snippet uses the attribute selector [aria-label="Dismiss"] within querySelector to pinpoint the button element precisely.

By employing this method, we ensure we fetch the exact element matching the specified aria-label attribute value.

Partial Match of aria-label Value

Sometimes, we might need to find elements based on a partial match of their aria-label attribute. JavaScript provides selectors that cater to these scenarios:

  1. Starts with (^=)
  2. Ends with ($=)
  3. Contains (*=)

Suppose we have the following HTML elements:

<div aria-label="Notification: Error">Error Message</div>
<button aria-label="Close Notification">X</button>
<button aria-label="Open Menu">Menu</button>

Starts with (^=)

Let’s say we want to target elements whose aria-label starts with “Notif.” We use the ^= selector to accomplish this:

const notificationElement = document.querySelector('[aria-label^="Notif"]');
console.log(notificationElement); // 👉️ div with aria-label="Notification: Error"

By using [aria-label^="Notif"], we locate elements where the aria-label attribute starts with “Notif.”

Ends with ($=) and Contains (*=)

Similarly, if we aim to find elements where the aria-label attribute ends with or contains specific strings, we use the $= and *= selectors, respectively.

Let’s move on to the third method:

Narrowing Down with Specific Element Types

In addition to targeting elements by their aria-label attributes, we can further refine our selection by specifying the element type.

For instance, consider the following HTML snippet:

<button aria-label="Close Notification">X</button>
<div aria-label="Open Menu">Menu</div>
<button aria-label="Submit">Submit</button>

Suppose we’re interested in specifically selecting button elements based on their aria-label attributes.

Narrowing Down Buttons by aria-label

To achieve this, we use a selector that combines the button element type with the aria-label attribute condition:

const closeButton = document.querySelector('button[aria-label="Close Notification"]');
console.log(closeButton); // 👉️ button with aria-label="Close Notification"

By employing this selector (button[aria-label="Close Notification"]), we precisely target the button element with the specified aria-label.

This method enables us to not only focus on aria-label attributes but also narrow down the elements by their specific types, ensuring a more refined selection process

Conclusion

get elements by their aria-label attributes using javascript provide a powerful way to access specific components, especially in scenarios where elements might lack distinctive identifiers.

Throughout this discussion, we’ve uncovered three fundamental methods:

  1. Exact Match using querySelector: Precisely fetches elements based on an exact aria-label attribute value.
  2. Partial Matching(^=, $=, *=): Enables searching for elements with aria-label attributes that start with, end with, or contain specific strings.
  3. Narrowing Down with Specific Element Types: Allows refining element selection by combining aria-label conditions with specific element types.

By leveraging these methods, we can efficiently navigate and interact with elements in the Document Object Model (DOM), enhancing accessibility and functionality within web applications.

Thanks for stopping by! Check out more from Source Freeze here!

Filed Under: javascript Tagged With: beginner, javascript, web developer

Capitalize First letter in JavaScript

December 10, 2023 by Source Freeze Leave a Comment

In this comprehensive guide, we’ll see the efficient JavaScript methods for capitalizing the initial letter of strings. We’ll explore practical techniques using charAt, toUpperCase, and other essential string manipulation functions to capitalize the first letter.

Capitalize First letter in JavaScript

We’ll take a look at 3 methods in this blog:

1. Using charAt Function

2. Using the slice and toUpperCase Methods

3. Capitalizing First Letter of Each Word

Let’s get right into the first one:

Using charAt Function:

The charAt function is utilized to extract the first character of a string. To capitalize the first letter, we can combine this method with other string manipulation functions.

Here’s a step-by-step guide on how to capitalize the first letter using charAt:

  1. Retrieve the first character: We’ll use the charAt function to get the first character of the string.
  2. Convert the first character to uppercase: Once we’ve isolated the first character, we’ll use the toUpperCase method to convert it to uppercase.
  3. Concatenate with the rest of the string: Finally, we’ll concatenate the capitalized first letter with the rest of the string, excluding the first character.

Let’s illustrate this with an example:

function capitalizeFirstLetter(string) {
    return string.charAt(0).toUpperCase() + string.slice(1);
}

let text = "hello, world!";
let capitalizedText = capitalizeFirstLetter(text);
console.log(capitalizedText); // Output: "Hello, world!"

This function capitalizeFirstLetter takes a string input, capitalizes its first letter, and returns the modified string.

2. Using the slice and toUpperCase Methods:

This approach involves using the slice method to isolate the first letter and the toUpperCase method to capitalize it.

Here’s a step-by-step breakdown:

  1. Extract the first letter: Use the slice method to retrieve the first character of the string.
  2. Convert the first letter to uppercase: Apply the toUpperCase method to capitalize the isolated first character.
  3. Combine with the remaining string: Concatenate the capitalized first letter with the rest of the string, excluding the first character.

Here’s an example implementation:

function capitalizeFirstLetter(string) {
    return string.slice(0, 1).toUpperCase() + string.slice(1);
}

let text = "hello, world!";
let capitalizedText = capitalizeFirstLetter(text);
console.log(capitalizedText); // Output: "Hello, world!"

In this function capitalizeFirstLetter, the slice method extracts the first character, the toUpperCase method capitalizes it, and the rest of the string is concatenated to form the modified string.

Capitalizing the first letter of each word in a string is a common requirement. One approach to achieving this is by utilizing the split, map, and join methods along with string manipulation functions.

Capitalizing First Letter of Each Word:

Here’s a step-by-step guide:

  1. Split the string into an array of words: Use the split method to divide the string into an array of individual words.
  2. Map through the array: Use the map method to iterate through each word in the array.
  3. Capitalize the first letter: For each word, capitalize its first character using the toUpperCase method.
  4. Join the modified words: Finally, use the join method to combine the capitalized words back into a single string.

Let’s illustrate this approach with an example:

function capitalizeEachWord(string) {
    return string.split(' ').map(word => word.charAt(0).toUpperCase() + word.slice(1)).join(' ');
}

let text = "capitalize the first letter of each word";
let capitalizedText = capitalizeEachWord(text);
console.log(capitalizedText); // Output: "Capitalize The First Letter Of Each Word"

In the function capitalizeEachWord, the string is first split into an array of words using the space (‘ ‘) as a delimiter. Then, the map function iterates through each word, capitalizes the first letter of each word, and finally, the join method combines these modified words into a single string.

Conclusion:

In conclusion, JavaScript offers various methods to manipulate strings and capitalize their first letters. We explored three effective approaches:

  1. Using charAt function: This method extracts the first character of the string and capitalizes it using toUpperCase.
  2. Utilizing slice and toUpperCase methods: Here, the slice method isolates the first character, which is then capitalized using toUpperCase.
  3. Capitalizing each word: By splitting the string into an array of words, capitalizing the initial letter of each word, and joining them back together, we can capitalize every word’s first letter.

Thanks for stopping by! Check out more from Source Freeze here!

Filed Under: javascript Tagged With: beginner, javascript, web developer

Next.js Warning: Extra attributes from the server

December 10, 2023 by Source Freeze Leave a Comment

This blog post will guide you through the annoying “Extra attributes from the server” warning encountered in Next.js 13 and beyond. We’ll explore the causes, multiple solutions, and best practices to keep your development environment clean and free of clutter.

Next.js Warning: Extra attributes from the server

Understanding the Warning

What is the warning?

The warning message ‘Extra attributes from the server’ is often observed in the console when working with Next.js 13 or higher looks like this:

Extra attributes from the server: class,style at html

This red warning indicates a mismatch between the HTML rendered on the server and what’s rendered on the client-side during hydration.

What causes it?

The culprit behind this warning is usually browser extensions, particularly those modifying the web page you’re viewing. Extensions like Grammarly, ColorZilla, and LanguageTool often add attributes to the HTML, causing the inconsistency during Next.js’s hydration process.

Solutions to Eliminate the Warning:

We’ll explore three effective methods to eliminate the warning:

1. Incognito Mode:

The simplest solution is to use your browser’s incognito mode (private mode). This temporarily disables all extensions, preventing them from interfering with Next.js and eliminating the warning. To access incognito mode, press Ctrl + Shift + N (Windows) or Cmd + Shift + N (Mac) on your keyboard.

2. suppressHydrationWarning Prop:

Next.js provides a built-in prop called suppressHydrationWarning that can be set to true on the <body> tag in your root layout. This explicitly tells Next.js to ignore any extra attributes encountered during hydration, effectively suppressing the warning.

Here’s an example:

// Root Layout (app/layout.tsx)

export default function RootLayout({ children }: { children: React.ReactNode }) {
  return (
    <html lang="en">
      <body suppressHydrationWarning={true}>{children}</body>
    </html>
  );
}

3. Disable or Remove Extensions:

If you prefer a more permanent solution, consider disabling or removing the extensions causing the issue. You can identify the problematic extensions by temporarily disabling them one by one and observing the console for the warning’s disappearance. Alternatively, you can switch to a different browser that doesn’t have the conflicting extensions installed.

Best Practices that can be followed:

While these solutions effectively eliminate the warning, it’s important to remember:

  • Avoid browser extensions in development: Extensions can introduce inconsistencies and unexpected behaviors, especially during development. Consider disabling all extensions while working on your Next.js project for a clean and stable environment.
  • Use dedicated development environment: Consider using a dedicated development environment like a virtual machine or container to isolate your development tools and avoid conflicts with your primary browser extensions.
  • Understand the root cause: While suppressing the warning can be helpful, it’s crucial to understand the underlying cause – browser extensions in this case. Understanding the root allows for informed decision-making and long-term solutions.

By implementing these solutions and best practices, you can maintain a clean development environment and eliminate the annoying “Extra attributes from the server” warning in Next.js.

Thanks for stopping by! Check out more from Source Freeze here!

Filed Under: javascript, NextJS Tagged With: beginner, javascript, nextjs, web developer

Remove all Classes from an Element in JavaScript

December 10, 2023 by Source Freeze Leave a Comment

There are several ways to remove all classes from an element in JavaScript. We will see more details in this guide first we have three methods below to remove all classes from an element that will see by one.

  • classList
  • removeAttribute
  • className.
Remove all Classes from an Element using JavaScript

1. Using classList Method to remove classes:

The classList property provides methods to add, remove, or toggle classes on an element. To remove a class, we’ll specifically use the remove() method.

const element = document.getElementById('yourElementId');
element.classList.remove('classNameToRemove');

Explanation:

  • Step 1: Select the target element using getElementById or another selection method.
  • Step 2: Access the element’s classList property.
  • Step 3: Use the remove() method of classList, passing the class name we want to remove as an argument.

This method is straightforward and efficient. However, keep in mind that it’s only available in modern browsers.

2. Using removeAttribute Method to modify classes:

The removeAttribute method enables us to remove attributes from an HTML element, including the class attribute.

const element = document.getElementById('yourElementId');
element.removeAttribute('class');

Explanation:

  • Step 1: Identify the target element using getElementById or similar.
  • Step 2: Apply the removeAttribute method, specifying 'class' as the attribute we want to remove.

This method is direct and works well for scenarios where you want to remove all classes associated with an element. However, it completely removes the class attribute, so use it judiciously based on your requirements.

3. Using className Property to remove or set desired classes:

The className property provides a straightforward way to modify or remove classes from an element.

Removing All Classes:

const element = document.getElementById('yourElementId');
element.className = '';

Explanation:

  • Step 1: Identify the target element using getElementById or similar.
  • Step 2: Assign an empty string '' to the className property of the element.

By setting className to an empty string, all classes associated with the element are effectively removed.

Assign a Single Class and Remove Others:

const element = document.getElementById('yourElementId');
element.className = 'desiredClass';

Explanation:

  • Step 1: Locate the element using getElementById or a similar method.
  • Step 2: Assign the className property to the desired class name that you want to set.

This method seems simple, but it replaces all existing classes with the specified ones.

Conclusion

In this blog, we explored three distinct methods for remove all classes from an element in JavaScript. We discussed the implementation of these methods using classList, removeAttribute, and the className property.

  • classList: Offers specific methods like remove() to remove individual classes.
  • removeAttribute: Directly removes the entire class attribute from the element.
  • className Property: Provides flexibility by either removing all classes or assigning a single class while removing others.

Each method has its merits and specific use cases, allowing developers to choose the most suitable approach based on their requirements.

Thanks for stopping by! Check out more from Source Freeze here!

Filed Under: ios-tutorial Tagged With: beginner, javascript, web developer

How to convert an Array to a Map in JavaScript

December 7, 2023 by Source Freeze Leave a Comment

This article provides you with a comprehensive guide on how to convert an array to a map in JavaScript. We will explore different methods and their benefits, ensuring you have the right tools for your specific needs.

How to convert an Array to a Map in JavaScript

Methods for Conversion:

  1. Using the Map Constructor
  2. Using Array.prototype.reduce()
  3. Utilizing Array.prototype.forEach()
  4. Leveraging for…of Loop

JavaScript offers multiple ways to convert an array to a map in JavaScript. Let us see the first method in detail.

Using the Map Constructor

One of the most direct methods to convert an array into a map in JavaScript involves the Map constructor. This constructor allows us to create a new Map instance from an array.

Here’s a step-by-step breakdown of how we can achieve this:

const myArray = [['key1', 'value1'], ['key2', 'value2']];
const myMap = new Map(myArray);

Explanation:

  • Create an Array: First, we have an array, myArray, which contains sub-arrays, each representing a key-value pair.
  • Use the Map Constructor: We utilize the Map constructor and pass myArray as an argument. The constructor accepts an iterable of key-value pairs ([key, value]) where each pair becomes an entry in the map.

Example:

const fruits = [['apple', 5], ['orange', 8], ['banana', 3]];
const fruitMap = new Map(fruits);
console.log(fruitMap);
// Output: Map(3) {"apple" => 5, "orange" => 8, "banana" => 3}

Here we’ll get 2 advantages:

  • Preservation of Order: The Map object retains the order of the original array
  • Unique Keys: Keys within a map are unique; if duplicate keys are found, the last key-value pair overwrites previous entries.

Using Array.prototype.reduce()

The reduce() method in JavaScript is powerful for transforming data structures. Here’s how we can use it to convert an array into a map in javascript:

const myArray = [['key1', 'value1'], ['key2', 'value2']];
const myMap = myArray.reduce((acc, [key, value]) => {
    acc.set(key, value);
    return acc;
}, new Map());

Explanation:

  • Initialize with new Map(): We start by initializing an empty Map.
  • Iterate Using reduce(): The reduce() method operates on each element of the array.
  • Set Key-Value Pairs: Within the reducer function, we use acc.set(key, value) to set key-value pairs in the map.

Example:

const animals = [['lion', 'roar'], ['elephant', 'trumpet'], ['giraffe', 'bleat']];
const soundMap = animals.reduce((acc, [animal, sound]) => {
    acc.set(animal, sound);
    return acc;
}, new Map());
console.log(soundMap);
// Output: Map(3) {"lion" => "roar", "elephant" => "trumpet", "giraffe" => "bleat"}

The use of reduce() offers a flexible way to convert arrays into maps, especially when custom logic or complex transformations are needed.

Utilizing Array.prototype.forEach()

The forEach() method in JavaScript provides a way to iterate through elements in an array. Although it doesn’t directly produce a map, we can use it to create one:

const myArray = [['key1', 'value1'], ['key2', 'value2']];
const myMap = new Map();

myArray.forEach(([key, value]) => {
    myMap.set(key, value);
});

Explanation:

  • Initialize a Map: We start by creating an empty Map.
  • Iterate with forEach(): Loop through each element of the array.
  • Set Key-Value Pairs: Inside the forEach loop, use myMap.set(key, value) to add elements to the map.

Example:

const cities = [['NY', 'New York'], ['SF', 'San Francisco'], ['LA', 'Los Angeles']];
const cityMap = new Map();

cities.forEach(([code, name]) => {
    cityMap.set(code, name);
});
console.log(cityMap);
// Output: Map(3) {"NY" => "New York", "SF" => "San Francisco", "LA" => "Los Angeles"}

The advantage we’ll get for using forEach() is that it is explicit and easy to understand for simple transformations.

Leveraging for…of Loop

The for…of loop in JavaScript provides an elegant way to iterate through elements in an array and create a map:

const myArray = [['key1', 'value1'], ['key2', 'value2']];
const myMap = new Map();

for (const [key, value] of myArray) {
    myMap.set(key, value);
}

Explanation:

  • Initialize a Map: We again start by creating an empty Map.
  • Use for…of Loop: The loop iterates through the elements of the array.
  • Set Key-Value Pairs: Inside the loop, myMap.set(key, value) adds elements to the map.

Example:

const colors = [['red', '#FF0000'], ['green', '#00FF00'], ['blue', '#0000FF']];
const colorMap = new Map();

for (const [name, hexCode] of colors) {
    colorMap.set(name, hexCode);
}
console.log(colorMap);
// Output: Map(3) {"red" => "#FF0000", "green" => "#00FF00", "blue" => "#0000FF"}

Advantages:

  • Readable Iteration: for…of offers a concise and readable way to loop through arrays.
  • Manual Map Population: Similar to forEach(), this method requires explicit setting of key-value pairs.

Conclusion:

Each method has its advantages, offering flexibility and readability based on specific use cases. The resulting maps retain key-value associations, allowing for easy access and manipulation of data.

By understanding these methods, we can efficiently convert an array to a map in JavaScript, leveraging the chosen technique based on the complexity and requirements of their tasks in JavaScript programming.

Thanks for stopping by! Check out more from Source Freeze here!

Filed Under: javascript Tagged With: beginner, javascript, web developer

Function is not defined JavaScript onClick

December 6, 2023 by Source Freeze Leave a Comment

If you’re new to JavaScript and see the “Function is not defined” message while using the onclick event in JavaScript, don’t worry—it’s common and fixable! This error pops up when trying to use a function that either doesn’t exist or can’t be found where it is needed.

Function is not defined JavaScript onClick

Understanding the Problem

Let’s break it down: when you click a button (thanks to the onclick attribute), JavaScript looks for a function to execute. But if it can’t find that function, it throws the “Function is not defined” error.

Identifying the cause:

Checking Function Names:

Ensure consistency in your function names—JavaScript distinguishes between uppercase and lowercase letters. Make certain that your function names are accurately spelled and consistently referenced throughout your codebase.

Function Placement:

Place your functions appropriately within your code structure. If they’re nested within other functions or hidden away in scopes, they might not be accessible when required. Position them where your entire codebase can access them without constraints.

Timing of the function definition:

For JavaScript to recognize your functions when needed, it is essential the functions defined before usage. If your functions reside in an external JavaScript file, ensure that this file is loaded before invoking the functions. In the case of functions in HTML, position them before the sections where they’re called upon.

Separate Files Verification:

If your functions exist in a separate JavaScript file, conduct a thorough check to ensure its proper linkage within your HTML document. Review the file’s location and inspect it for any potential mistakes that could impede its connection.

HTML Reminder:

When utilizing the onclick attribute, only specify the function name without parentheses or arguments. Maintain the format like this: onclick=”firstFunction()”.

Example Code Walkthrough:

Here’s a simple example that triggers the “Function is not defined” error:

<!DOCTYPE html>
<html>
  <head>
    <title>Resolving Function is not defined</title>
    <script>
      function firstFunction() {
        alert('Clicked First Button');
      }
    </script>
  </head>
  <body>
    <button onclick="firstFunction()">First Button</button>
    <button onclick="secondFunction()">Second Button</button>
  </body>
</html>

I’m sure this is the message you’d be seeing in the console (Click Ctrl + Shift + J to view console):

Solving the Issue:

Adding the missing function resolves the error. Here’s the fixed code:

<script>
  function firstFunction() {
    alert('Clicked First Button');
  }
  
  function secondFunction() {
    alert('Clicked Second Button');
  }
</script>

In Conclusion:

The “Function is not defined” error is a common issue in JavaScript, especially when handling onclick events. By following these steps and making sure your functions are in the right place, you’ll solve this issue like a pro!

Feel free to ask any questions or share thoughts on this topic!

Check out more from Source Freeze here!

Filed Under: javascript Tagged With: beginner, function, html, javascript

What does colon do in JavaScript & TypeScript?

December 6, 2023 by Source Freeze Leave a Comment

In JavaScript, the colon (:) serves multiple purposes across different contexts, primarily as a separator and a syntax element within the language. Let’s dive into its key roles:

Here’s a list of the functionalities that a simple colon {:} provides us:

1. Using Colon in the Object Literal Syntax

2. Using Colon in the Ternary Operator

3. Using Colon in the Labeling Statements

4. Using Colon in the Object Destructuring

5. Using Colon in the switch Statement

6. Using Colon in the ES6 Method Shorthand

7. Using Colon in the TypeScript Type Definition

Let’s take a deeper dive into all these uses:

1. Colon in the Object Literal Syntax:

In JavaScript, the colon is instrumental in defining key-value pairs within object literals:

let person = {
  name: "Jacob",
  age: 30,
  city: "Sydney"
};

Here, the colon acts as a separator, associating property keys (e.g., name) with their corresponding values (e.g., “Jacob”).

2. Colon in the Ternary Operator:

Within conditional statements, the colon is an integral part of the ternary operator, enabling concise conditional expressions:

let status = (age >= 18) ? "Adult" : "Minor";

The colon separates the true and false expressions. If the condition (age >= 18) holds true, status receives the value “Adult”; otherwise, it’s “Minor”.

Output: Depending on the value of age, the output for status will be either “Adult” or “Minor”.

3. Colon in the Labeling Statements:

Though less common, labels in conjunction with the colon (:) allow developers to mark specific statements, often used in complex nested loops, enabling control over loop flow.

Consider this example:

outerLoop: for (let i = 0; i < 3; i++) {
  for (let j = 0; j < 3; j++) {
    if (i === 1 && j === 1) {
      console.log("Break outer loop");
      break outerLoop;
    }
  }
}

Here, the outer loop: acts as a label marking the outer loop. The break outer loop; statement within the nested loop structure signals to exit of both loops once a certain condition is met.

Two key things are happening here. Let’s understand better;

  • Labeling Syntax:
    • outer loop: marks the beginning of the outer loop. This label can be any valid identifier followed by a colon (:).
    • break outer loop; is used to break out of the labeled loop when a specific condition (i === 1 && j === 1) is satisfied.
  • Controlled Loop Termination: When the condition within the nested loops (i === 1 && j === 1) evaluates to true, the break outer loop; statement causes an immediate exit from the outer loop, bypassing further iterations. Without this labeled statement, breaking out nested loops simultaneously becomes challenging.

Output:

Break outer loop

4. Colon in the Object Destructuring:

During object destructuring, the colon facilitates property renaming:

let user = { firstName: 'Rachel', lastName: 'Green' };
let { firstName: fName, lastName: lName } = user;

Here, firstName: fName renames the property firstName to fName during the assignment.

Result: The renamed properties fName and lName will hold the values of firstName and lastName from the user object.

5. switch Statement

The switch statement in JavaScript employs the colon (:) in combination with the case and default keywords to execute specific code blocks based on the comparison of a given expression’s value.

switch (color) {
  case 'red':
    console.log('The color is red');
    break;
  case 'blue':
    console.log('The color is blue');
    break;
  default:
    console.log('The color is neither red nor blue');
}

Result: Based on the value of the expression within the switch statement, the corresponding case block or default block is executed, producing different output messages depending on the matched condition.

6. Colon in the ES6 Method Shorthand:

ES6 introduced concise object method shorthand using the colon:

let obj = {
  name: "James",
  greet() {
    return `Hello, ${this.name}!`;
  }
};

Here, greet() is a method defined using the concise ES6 syntax.

Result: The method greet() will output a personalized greeting based on the name property within the obj.

7. Colon in the TypeScript Type Definition:

In TypeScript, colon usage extends to type definitions during object initialization:

let user: { name: string, age: number } = {
  name: "Monica",
  age: 28
};

Here, the colon specifies the types for the name and age properties, ensuring strict typing for objects.

Now, the TypeScript compiler will ensure that the name should be a string and age should be a number for objects conforming to this structure.

To Sum it all:

The colon in JavaScript exhibits incredible versatility, serving as a critical syntax element in defining object properties, conditional operations, label statements, object destructuring, ES6 method shorthand, and TypeScript type definitions. Its multifaceted applications significantly impact JavaScript’s readability, structure, and functionality, empowering developers with a diverse set of tools for effective coding practices.

Checkout more from Source Freeze here!

Filed Under: javascript, NextJS Tagged With: beginner, colon, es6, javascript, switch, ternary, typescript, web developer

« Previous Page

Recent Posts

  • How to Generate random numbers in JavaScript
  • How to Scroll to an Element in a React Component?
  • How to get a Date without the Time in JavaScript
  • How to modify url without reloading the page using javascript
  • How to disable server side rendering in nextjs
  • How to get a file type from URL in JavaScript

Recent Comments

    Tags

    beginner colon cross-platform es6 function html ionic iOS javascript mobile application development nextjs objective-c swift switch ternary typescript uiwebview Visual Studio plugin web developer

    Copyright © 2025 Source Freeze